Whenever I think of lemons, images of colorful Spring, sunshiney days come to mind. And since it is Spring (IS it really though???) I decided to bake up some little lemony sunshine of my own.
Miniature Lemon Sunshine Sandwich Cookies, I know it’s a mouthful, but whatev’s they are good, tiny and delicious!
Lemon jut imparts a bit of sweetness into any day! These are perfect as a treat or a gift!
Check out the full recipe as I guest post over at Bake It Up a Notch today!!
In less than three weeks my little peanut Sami Jams will be turning five. As I reflect on the past five years, I am slightly thrown off at how fast it that it really went by. Random people I would meet on line at the supermarket used to look at my frazzled, three kids in tow self and pass along their gentle words of parental wisdom, never forgetting to pat my arm and express to me to enjoy every moment; even the insane ones, because they would grow so fast. But I never realized “how” fast that really meant. So if you are unsure then know fast means ridiculously, you won’t even believe it fast.
She decided that this year she wanted a fairy type of Tinkerbell party. Now I must admit that I like to do as much as I can to make my childrens birthday’s as magical as I think chilhood should be. I want her to look back at these days as ones filled with laughter, love, joy and filled with the type of magic that kids love so much. It all began with the invitation design. I created a stylized version of Tinkerbell as I didn’t wan to get stuck using just ideas relating to the Disney version of her.
I am doing my best to create as many fun themed things to add to the party, beginning with these colorful butterfly dessert spoons.
Punch out all of your butterflies out of both the solid and patterned paper. Also Punch out all the circles that you will be needing. Fold the top butterfly (patterned paper) slightly in the middle so that the wings fan out.
Using a glue gun or glue dots attach it to another butterfly (solid color).
And then attach it to the round punch paper…
Finally attach to the BACK (Flip the spoons over)of the top portion of the spoon.
So incredible easy right!!!! These are perfect place in little cups of jello, pudding, cupcakes small cookies or cakes…anything really. They just add a pop of fluttery, fun into any fairy, butterfly or Tinkerbell themed party.
Hope you enjoy and stay sweet my peeps!
Items used to create this project that are available on Amazon.com (commission earned for sales)
I cannot even begin to explain how terrible this winter was and how incredible thrilled I am that it is almost over!! Maybe it’s because of me having three small children literally trapped in the house for months clawing at the walls, drooling on the windows wanting so badly to play outside. Or maybe it’s because we all just seemed to pass one form of illness on to the next for the past few months, or that it has been cold and snowy….
Whatever…I guess it comes with the season. But at least it’s almost over. I can smell spring just on the edge of each gusty March wind and am counting down the seconds until the Sun shines warmly on my skin. With a new season almost upon us what better way to celebrate that with a giveaway!
A cash giveaway. I bet there is a ton of stuff $1100.00 could purchase. Good LUCK, and I hope it’s a lucky spring for you!!!
$1100 Thank Goodness It’s Spring Cash Giveaway March 27, 2014 at 11:59PM toApril 21, 2014 at 11:59PM Open Worldwide
PRIZE: One winner will receive $1100 USD payable via PayPal Eligibility and Rules: This giveaway runs from Thursday, March 27, 2014 at 11:59PM to Monday, April 21, 2014 at 11:59PM. It is open to individuals over the age of the majority in their home country. The winner will be chosen randomly through the Rafflecopter form. It is the sole responsibility of the winner to report to and adhere to all laws in their respective country, which includes payments to any governing tax body. This giveaway is void in any country or territory where it is prohibited by law. Claiming Prize: The prize will be sent via PayPal. The winner must have a PayPal account to receive it. The winner also must claim their prize within 48 hours of receiving notice. If you do not claim your prize within this time frame, your entry will be void and another winner will be drawn. Please ensure that spaceshipsandlaserbeams [at] gmail [dot] com is on your “safe list.” Disclosure: This is a blogger-sponsored event that is in no way affiliated with PayPal, Facebook, Twitter, Pinterest, Instagram or any other social media channel. If you have questions, email Stephanie at Spaceships and Laser Beams at spaceshipsandlaserbeams [at] gmail [dot] com.
Please use the Rafflecopter below to enter! None of the entries are mandatory but the more entries you do, the more chances you have to win! Running short on time? Come back as often as you like to finish the form and maximize your chances of winning the big prize.
I love a good surprise. I also love a yummy decorated cookie, so when you take both of those elements and create this idea of a cookie with a surprise of candy tucked and hidden inside I’m all about making them. Cookies like these have intrigued me since peeking at these candy filled pinata cookies some time back and I have been anxious to make my own version ever since.
As most SAHM know that finding time to do anything for yourself, can at times be a tough. For me as soon as I sit down, someone wants juice, or crackers or a movie on or just me in general. It becomes a challenge to find the time I need to actually pull these ideas from the constant buzz of ideas inside my head to create them.
These candy filled Easter egg cookies were actually the first version of these cookies I made, even before I made the Pot of Gold version for St. Patrick’s day. That idea was born as I was working on these and since St. Patty’s day tends to come before Easter, I posted that one first.
Before I get into the whole shabang, about how I made them I need to insert a small bit of information here. Typically when I make decorated sugar cookies I use Royal Icing to decorate them. I also use Royal Icing when I make sugar toppers for cupcakes like these or these..
But I get a lot and I mean a lot of emails asking me about Royal icing; what is is, how to make it, where to buy it and sometimes just complaints about it. I personally love using it and working with it, as I find it to be unlimited in it’s creative possibilities, but lets be real for a moment.
Preparation, coloring and discovering what the proper consistency can be a bit time consuming for the person using it for the first time. It does even for people like me that have worked with it more. So I have a solution…..for me and for you, for right now. Because as much as I love it, finding the time to prepare it is next to impossible right now and that is at this moment in time like a sharp pin popping my balloon of creativity.
But I found alternative that can suffice for the time being….ready …wait for it….. Betty Crocker Cookie Icing, you can find it at most grocery stores.
It is not Royal Icing, so it’s not for fine detail, it’s has more of a glaze consistency and never dries as hard as Royal Icing does. But for easy to do quickie decorating it totally works. It colors very easily and the consistency is perfect for outlining, filling and a bit of detail work as long as it’s not so intricate. Its a great alternative a pinch
Now moving on.These cookie were made using an amazing vanilla sugar cookie recipe from LilaLoa.com. As I have mentioned before these are my absolute favorite Vanilla Sugar Cookie as of the moment. If your up to making the dough try her recipe. But if your not feeling that adventurous, go buy some sugar cookie dough at the store, although they most likely won’t hold there shape so perfectly after baking.
This is what you will need…
Egg Shaped Cookie Cutter
Sugar Cookies
Royal Icing or Betty Crocker Cookie Icing
Colored chocolate melts (You could just use this to decorate if you wanted)
Gel food coloring to color you icing.
Decorating Bags or small plastic baggies
Decorating tips/couplers
Miniature candies to fill cookies with.
Wax Paper
Roll out your sugar cookie dough and cut out your shapes using the egg cookie cutters. Each cookie is comprised of three parts, so make sure you cut enough cookies out of the dough to be able to assemble them at a later time. Keep two whole and cut a small hole in another (using whatever works.)
Bake the cookie according to recipe directions and allow them to fully cool, before you move onto the next steps. After they are fully cooled you can get ready to assemble them. First I decorated the the tops of the cookies using the cookie icing. I colored the icing I was using a very light pink color. Pipe a nice line around the cookie and let it set.
Do this for every cookie and by the time you finish you can go back and fill in each cookie.You will need to let these sit and dry for a bit before adding in the additional details on top of the cookie.
After they have formed a nice crust on top, if you want to decorate it more you can do so. I used white icing and made a few designs on top of the cookie, to make it a bit more interesting. I started with a zig…
And added a little zag….
And finished it off with some curve lines and dots Add what you wish here..use your imagination 🙂
I let the decorated tops dry overnight, but I’m sure a few hours would suffice it you need them faster then that. To put the entire cookie together, get the rest of the pieces and begin assembling them. I used white chocolate candy melts to attach the pieces, because I knew it would dry hard and keep it all together. I just added a bit to the bottom part of the middle layer cookie.
And attached it to the bottom piece.
Let it set up and then the fun begins as you can now fill it with candies! Just don’t overfill it as you won’t be able to attach the top. I used these fun pastel colored hard candies, that my kids call marbles.
Now add the top, I also used melted white chocolate here as well to keep it all together. How pretty!
Let them fully set up before you start doing fun stuff, like cracking them open.
I love how those little candies look spilling out of the cookie!
An easy and hopefully fun filled way to brighten up an ordinary cookie and make it a bit more special for Easter!
Hope you enjoyed this post! If you have any questions, please feel free to leave a comment below!
Did you ever have a day when your ability to draw/pipe/create anything beyond a cup of coffee is just off and all you can muster is a few shameful bits of creativity that amount to just about nothing?? A day in which you wonder why you ever try to do anything in the first place? A day when you feel less than, not good enough and never gonna be good enough so WHY am I even bothering?
Although I am quite confident in myself a times, I do also have moments when my own version of self doubt rears her impeccable self and starts up with her incessant chitter chatter in my head. Through the years I have been able to keep her at bay and learned to ignore that part of my negative self, but unfortunate sometime she comes out at the most random of times flipping her perfectly coiffed hair about out and is just a snarky b*tch.
I haven’t been feeling to well as of late. This winter has reeked havoc in our household in regards to us all passing one illness along to the next like a game of toss. And one thing I know is that when I feel off either, mentally, emotionally, physically or even spiritually; an opening always presents itself and a darker version of myself walks through.
The voice of self doubt.
I have been going over old photos and old projects that I did when I first started writing this blog a little over three years ago. It’s funny that sometimes all you need is a little space and time in between where you once were to where you are to see how much you’ve grown and that is tangible evidence that has the capacity to shove that self doubt back into the darkness. I have improved in so many areas and I just wanted to show you all what happens when you keep doing something you enjoy!
This was one of my first Royal Icing ventures it was a set of Darth Vader cupcake toppers I made for a friend. I really didn’t understand consistency at that time and they came out really bobby with no real definition……can you tell??? The photo is a real gem too 😉 I didn’t understand photo composition so much then, an just took photos to record what I had done.
Fast forward a few years and with a few projects under my belt and this is what I was able to do. This is one of my all time favorite sets. Notice the correct lighting, no flash photography here! And no head on shots, everything is set o a bit off centered and angled about, which in my humble opinion is much more interesting to the eye.
Here is another newer cookie done with Royal Icing. I was able to use a stencil in this as well, something I would have never been able to do when I first started!!
Since I am already mentioning my less than stellar photography skills, which have gotten much better, I though I would include a few “Then” and ‘Now” pictures. As you will see my photography skills have definitely improved as time has gone on. This is a picture of some cupcakes I made a long, long time ago. I didn’t know much a bout anything, not that I do now, but I am also pretty sure that flash (shudder) was on. No background , boring old plain counter top. nothing to entice the eye.
Now these are photos of more recent cupcakes I have made. I’m thinking that these look about a million and four times better than the above photos. The foreground is interesting and keeps the eyes focused on the subject matter, so the eye circles the picture rather than floating off to the next interesting thing it finds.
Here are my character cupcakes…..again terrible photo, with a flash, the colors are wrong and the photo is blurry.
This is another photo done later on….still not the best, but getting much better. Color is corrected and no flash.
Getting better, at least I am adding in more visual interest.
Then…
A bit closer to now…
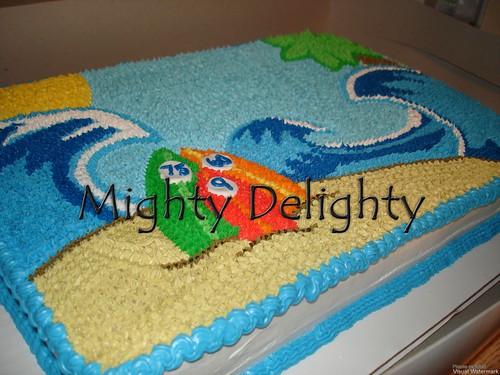
Here is one of my “first” cakes All piping, my hand was killing me!! An I’m sure you can notice that awesome flash photography again!!
This is one of my more updated cakes. I was able to pick up a few new techniques in the past few years!!
Sine I am mentioning all of the other counterparts of my creative side, I want to share the newest part of my journey. On this baking journey of mine I discovered a passion for creating fun printables. This was one of my first digital printable I ever made. Very simple, to the point and perfect for where I was at that time creative wise. It was also what the above Snow white cupcake was based on.
But, because I kept at it and didn’t stop because I thought everyone was so much talented then me, I was able to push past my own personal barriers and create this.
and this….
and this…..
and I can’t forget this one 🙂
Just a few of my favorites <3
As I wrote and re-read this post that voice of self doubt has withered away into the darkness it belongs in.This post is now a reminder to myself myself that the joy is in the journey and oftentimes so is the discovery. If anyone told me a few years back what I would be capable of creating. I don’t think I would have believed it.
So if you have a passion for something…keep at it as what I have learned is sometimes the passion is so great that it overshadows the initial talent, but in time they join forces and begin to collaborate in order for wonderful things to come forth!
Tell me please, where are you on your own creative journey?????
If you know me , then you may have seen these little creations or these. Then you might have realized it would only be a matter of time, before I made another version. I can’t help myself, most of the time my brain just works like this! Some people think of making great architectural structures or the next big technological leap and I think of what I can make out of yogurt.
Just my way of expressing my creativity and doing my part to contribute to the grand scheme of things! 🙂
Truth is my kids can’t get ENOUGH of these, so it’s my job to think of the next great thing to create. And since I use Greek yogurt to make these they do add a nice protein punch into their diets and make me willing to make them whenever they want them. I personally use Fage yogurt, because it is hands down the best yogurt EVER! (That is strictly an opinion of mine, which makes it sort of a fact in my world.)
The idea of these cute bunny bites popped into my head randomly this morning as I did the half asleep shuffle into the bathroom to brush my teeth. Because most people think of things like this at that strange moment in time right???? Or not.
Anyways they are super easy to make and only take minutes of your precious time.
This is what you will need……….
Yogurt (Greek, I use Fage brand, but use what you like)
Food coloring orange and green
Decorating bags or plastic baggies to pipe
Wax paper
I also use plain yogurt which I flavor and sweeten at home, personally I like it that way as do my kids, but you can use whatever flavor preference you like. Next tint your yogurt orange and green.
Scoop each mixture into a decorating bag or a plastic baggie and snip off a small piece of the corner to pipe the shapes. Starting with the orange create the shape of the carrot by piping a zig zig type of line onto a sheet of wax paper. Be sure the wax paper is on something that will allow you to transfer the piped images into the freezer.
After all the lower portions of the carrots are finished, start adding the greens on top. I also did this by adding a zig zag pattern.
After they are all done, place them in the freezer for about an hour! They will be little frozen bites afterwards
Be mindful they will melt! But they usually don’t last that long!
What other fun shapes would you like to see these made into???
Give me an idea or four as I would love a new challenge!
But I’m not just talking apples and oranges here. I’m talking about the big, luscious, bright, vibrant berries I see during my fifty thousand trips I make to the supermarket every week. I never get everything I need or what I painstakingly took an hour to organize and write upon my shopping list (if I even remember to bring it.) I always have my three kids with me and well, if you have ever taken your kids food shopping you know what I mean. If your unsure then borrow someones kids for an hour and go food shopping.
But let’s get back to the berries, shall we!! Each time I enter the store determined and focused on my task to get that one specific item I need and keep forgetting, I am immediately greeted by overfilled display stands of ripe intoxicating berries. Which assault (in the nicest way possible.) my senses with their berrilicious splendor. During my latest (but not last) trip to the market, the raspberries started signing my name super loud and calling to me, not wanting to ignore them and make them feel bad, I picked up a few containers.
Raspberries happen to be my favorite berry, obviously because they are sweet and delicious, but I believe more so because they are interlaced with such wonderful memories of my childhood. Being so little and seemingly lost in the magical wonder of my Mother’ magnificent garden, carefully not to get pricked as I picked the ripe, sweet berries bursting with the essence of the Summer.
Let’s just say that my original mission to pick up eggs or whatever this trip needed is forgotten.So what’s a girl to do??? Pair it with something sweet of course and call it a day! What aisle is the flour and sugar in again??
Raspberry White Chocolate Shortcakes.
Now before I even begin, I wasn’t even sure I was technically allowed to call this a shortcake. But since I did a little internet research, I was able to find just enough information that justified my actions in calling this just that.
So there! (Just kidding by the way if I am wrong.) To my surprise these came out even better than I had hoped. The base that I used for the shortcake is actually a scone recipe I use which I adore, because it is not too dry and not tasteless. It is light and moist and pairs with just about any flavors perfectly.
For the filling I skipped over the whipped cream and went to something more dense and flavorful and complemented the pure sweetness of the berries with out diluting it. It started with a fruit dip comprised of cream cheese, marshmallow fluff and a but of bit of melted white chocolate and then topped off with a bit of glaze on top.
Sweet but not too sweet.
This is what you will need…..
For the Scones
2 cups flour
1/3 cup sugar
1 tablespoon baking powder
1/2 teaspoon salt
1 1/2 cups Heavy Cream
1/3 White chocolate chips finely chopped
For the filling..4 oz Cream Cheese softened4 oz marshmallow fluff1/2 tsp. vanilla extract1/4 cup white chocolate chips2 tbsp heavy cream.To make the shortcakes(scones)……
Preheat your oven to 400 degrees. Combine the sugar, flour baking powder and salt and make a small well in the middle of the mixture.
Add your heavy cream and chopped white chocolate chips to the well and combine. The mixture should be crumbly and not mixed smooth. So just quickly incorporated all the ingredient just until they are loosely mixed.
Spoon onto a parchment lined baking sheet. Make them as large as you would like to make your shortcakes as each one will be split to create two parts. You can shape them up a little if you like.
Bake for 12-14 minutes, do not over bake, let me repeat that do not over bake them or they will get dried out and you will think the recipe is terrible and then tell me you hate me, I can’t stand rejection so please let’s avoid it and just don’t over bake them.
When they are done they will have a golden brown color forming on top.
To make the filling…
I would suggest that before you make the scones, make the filling. This will give it a chance to set up a bit firmer in the fridge and allow the full flavor to develop as it sets.
In the microwave heat up the heavy cream.
Pour over the white chocolate chips and stir until melted. (quickly)
In a small bowl combine cream cheese, marshmallow fluff and vanilla extract
Add in melted white chocolate, mix well.
Let this set up in the fridge.
When your shortcakes are cooled it’s time to assemble them.
Split the shortcake through the middle lengthwise.
Add some filling…..
Add some raspberries….
Put the top back on and squish very gently….
Serve on a plate with some extra raspberries and add some glaze to the tops!
For the glaze on top (optional) you will need….
1 1/2 tablespoons butter, melted
1/4 tsp. vanilla extract
3/4 to 1 cup powdered sugar
Melt butter in a small saucepan, add in powder sugar a little at a time and whisk to combine and add vanilla extract. Spoon over shortcakes and let rest for a minute before serving.
You can technically make these with any berry you prefer, so please don’t feel obligated to make them only with my favorite berry!
How would you make these? What is your favorite berry, please let me know!!
There is this curly haired girl blocking my entrance into the kitchen, demanding sweetly with wide doe eyes that more goldfish be put in her pink cupcake adorned snack cup. This is nothing new as it happens daily, with three different kids. But for some reason this time make me stop in my mechanical robot Mom motions. I realize that this little girl, this little person in front of me, the very one standing and demanding is my first baby girl, who in fact is no long a baby as she will be five next month!
FIVE??
What the what!! I’ve read and listened to other parents tell me about this moment on line at the grocery store, that realization that their babies are growing up. I just thought that it would happen in a more memorable, drama filled, movie like way. Where there would be butterflies and rainbows and puffy clouds and we would all be dressed in matching outfits and maybe ere would be soft music playing somewhere. But no, it happened just like any of the other moments in my life as a Mom and as soon as it happened the next moment rushed in pushing us forward in time.
When she was a baby I remember getting up a thousand and three times throughout the night to sooth her and her never, ever napping during the day like I “believed” babies were supposed to. It seriously seems like just a few weeks ago when we were there in that stage of crazy no sleep mama & baby. But that was five years ago and in between that time she has grown into ash blonde, brown eyed, banana joke telling, copy cat funny girl, who gives the sweetest hugs when they are needed the most and can chat up anyone, anywhere like they have known each other their whole lives.
Which I m aware in her case five years, but whatever, you get the idea
When I decided that this year would be the year to really begin planning her party early, I started asking her what kind of party she wanted and without missing a beat she proclaimed, “I want a Tinkerbell Fairy Party!”
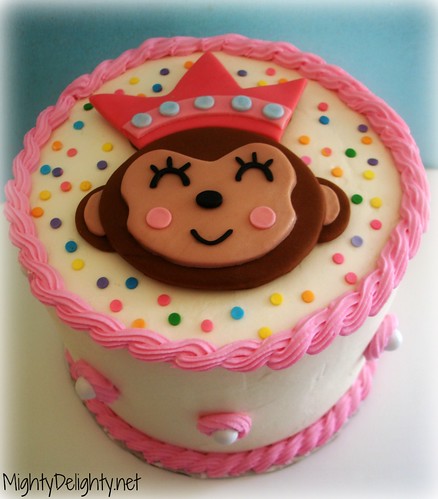
I can get down like that and I guess she likes fairy’s because last year she was all about the fairy monkey princess party. She discovered that idea off of her favorite nightgown. For this year though I have a pinterest board filling up with ideas that I plan to use to inspire a wonderful birthday party for her on a budget. (If you have some great thoughts or pins you would like to add, message me and I will add you as a pinner!)
And yes I just said he “B” word, no not THAT word, the other one BUDGET. Because if you know me then you know I love finding cost effective ways to create fun themed parties. And much of that comes from my own ability to create, which also brings me to the inspiration point of her party…her invitation.
Let me first say I love Disney. I love all their characters and the inspiration they create. But when it comes to creating designs, I like to have to creative control over my own creations. I have also found that at this stage my daughter like what I make, so it works. I stayed in line with some of the colors that Tinkerbell is associated with, mainly green, but so I don’t get stuck with a specific range of colors I added in yellows, pinks, and blues.
Like most of my other character designs, I made her with an over sized decor on her head, this one happens to be a bow, much like the Snow White Character I designed a while back. I tend to over extend it so that it needs to be cut out from the invitation itself, her wing also peeks out! Personally I think it adds a little extra flair to the invitation!
Originally, I also made her little foot stick out too, but I think I will fit it back onto the invitation because it makes cutting that side of the invitation perfectly and neurotically (me) straight a bit more of a challenge. As I am sure you can see from my less stellar cutting job in the picture. This is what the rest of the party will spring forth from and I can’t wait to start sharing all of the other things I am creating and planing!!!
Have you every attended a Tinkerbell or Fairy party? Do you have any decor or food ideas you want to share??? Please feel free to leave a comment and share, I can use all the help I can get!!
Since I met and moved in with my once boyfriend, now husband. The house we live in has the back portion of our home converted to a semi apartment. It was originally built by my husband for his father to live in, but since his passing, it has been used to help out a few friends get back on their feet.
But as our family as grown over so rapidly over in a few short year, we decided that as a family we needed more space. Little did I know how much my home would open up after saying buh bye to a few walls.
That’s my hubby making faces through the now disintegrated wall, I disguised him with some sunglasses and a mustache in case he doesn’t want his face plastered all over my site 🙂
At this point we are gutting and remodeling our bathroom and a spare room into our master bedroom the bathroom. I think after we finish those two projects we will take a break for a minute or two to enjoy our new designs . And then in a few years we will be renovating our old kitchen; blowing out a back wall and joining two rooms to become one huge kitchen.
In the meantime I will use the extra space as a office/work space. Which is perfect for me, because it keep my little ones from trying to destroy play with all of my stuff. By the time we make this next renovation, I am hoping my little ones will not be so curious of my work and stop touching it .
I’m super excited to redecorate and plan all of the design work with my husband and I have been pinning a lot of bathroom and bedroom ideas, heck I’m even pinning kitchen ideas at the moment.
I am loving all of the colors that are around right now and I think I will be going with this color palette from Benjamin Moore for the paint for our bedroom.
I just love the way gray looks on the walls!
I would really love to try and figure out some new ways to upcycle some of our old furniture, because it would be nice to save some money on new furniture, but also because the challenge o creating something new from something old is always a fun and creative challenge. We have s few different style of dressers ( I know, so outdated) like the one pictured below. I would be curious to see if either my husband or myself could figure out something to make them a bit more updated and in tune with the style we now like.
As I mentioned we are also gutting an remodeling our bathroom, we are working with a narrow space, so I am always looking for ideas for smaller type of spaces. So far I have found a few like this one that I will try and draw inspiration from. For the decorating ,I love the look of two shower curtains which we also decided we would go with instead of glass doors, until my little ones are bigger. And then if we want to to switch it we will.
I will be updating the process every now and again. Now I need to let you all know this is something so out of my comfort zone. Typically with all the choices available, I tend to get overwhelmed and I cop out and go with solid colors (black, beige, brown) and never experiment with designs, patterns, or even color for that matter.
I have decided that for these upcoming changes I will take on the challenge of stepping out of my boring old decorating routine and just have fun with it all!!
I’l post some before pictures soon!!! Trust when I tell you my bathroom right now is very old. We still have a seashell shaped sink.
I’m really, really, REALLY over the winter. I cannot wait to till the smells, colors and sensation of springtime begin to invade all of my sense with it’s rejuvenating essence. I am that person that complains about the cold of winter AND the sweaty in places I shouldn’t be days of summer.
I’m really not a fan of the extremes of either season. If I had it my way I would live in a climate that is eternally spring like and fall like. But since I live in NY which is none of these and am not planning on moving anytime soon, I guess I’ll have to suffer.
Whatever, either way I now that spring is almost here and in a show of good faith I though I would make something to reflect my absolute love of it. Now nothing makes me think of spring more that the incessant chitter chatter chirping that goes on in the morning and as of late it has returned, and to honor those talkative little birdies I recreated them in edible form.
So weird, right. But I hang on the left side of almost normal, pinkie swear!
Baby Bird Nest Cookies
These are the some of the easiest cookies you can ever make, as they require NO baking and just a little patience. They can be tweaked with ingredients and color coordinated with any type of season.
Like little red birdies for Valentines day…get it love birds.
Or you can use green candies for St. Patrick’s Day. If you have mini marshmallows you could also make them little leprechaun hats!
And for the Christmas holiday season you could go with red and green birdies and create some mini Santa hats for them!
So many different ways to make these little birdies more festive. And they are guaranteed to be a hit, because they are Cadbury eggs, so that leave just about negative 100 chance survival rate for those little guys.
Read along, grab the recipe and full how to make as I share all of this bite sized fun with my latest guest post over at Bake it Up a Notch !
Enjoy and happy creating!!!
We use cookies to ensure that we give you the best experience on our website. If you continue to use this site we will assume that you are happy with it.OkNoPrivacy policy
You can revoke your consent any time using the Revoke consent button.Revoke consent