Shamrock Frozen Yogurt Bites

shamrock frozen yogurt bites recipe

Shamrock Frozen Yogurt  Bites…

Just when I thought I was done with the St. Patrick’s day themed treats, I realized I forgot to add this one. Which is just a simple, fun little recipe that you could make with the kids.  If you have followed along with me, then I’m sure you’ve seen versions of these frozen yogurt bites. I make them all the time for my kids and figured why not make one more version.

These are super easy to make and you probably have all the ingredients on hand already! It’s really not much, so I’m not sure if this even qualifies as a recipe at all or more of something to do with the kids, that won’t make you insane in the process..

This is what you need…

  • Yogurt ( I used Greek yogurt)
  • Green food dye
  • Wax paper
  • Plastic Baggie or decorating bag

Let me first say that personally I like to use Greek yogurt. I am a huge fan of the thick, creamy consistency and the protein content is also a bonus. My favorite brand is FAGE, if you have never tried, please do. SO CREAMY!

I also use the plain yogurt and flavor it with a sweetener of choice, like honey. I try to keep it as close to natural as I can, but sometimes sugar is what I use. But if you choose unflavored yogurt, add whatever your flavor of choice is, I prefer a vanilla flavor, as do my kids, so I use vanilla extract.  I also try not to give my kids artificial sweeteners, but for myself I have no issues using them. What this all means is use what works for you.

Mix  yogurt and green food dye to get the color you desire.

And just so I don’t forget  those of you that are not into “Food Coloring”, just skip it. I know that there are a lot of varying opinions about the use of colors  in food, so if it’s not for you, please just don’t add it. But if you have something else that you might use instead,to give it a green color, please feel free to share what you used, so someone else can pick up on that tip!

You can pipe the shamrock shapes onto a sheet of wax paper that you place on top of a cookie sheet.

But first scoop the mixture into a decorating bag or a plastic baggie and snip the corner off. I made a bunch of swirls that resembled a shamrock, try a few different things to see what works for you! If you are not up to being creative, trust when I tell you my kids aren’t picky if they are only shaped like frozen blobs.

Stick them in the freezer for a a bit. I typically leave them in there for about an hour, which I have found is a good enough time. But since I’m not so great with remembering things and get so easily distracted by the other ten million things that I have to do each day, I actually left mine in the freezer overnight.I’m surprised my kids didn’t remind me a hundred times about them, because they are so very good about asking and reminding me of things they want that I constantly forget about. I like to say that the reason behind my general absent mindedness, is because I am a exhausted & foggy brained, more importantly outnumbered  mother of three. But I really believe that is an excuse that others identify with, and that is just who I am, and I’m cool with my scattered mind. Needless to say the next day they were perfectly frozen, you could even see all the little ice crystals in them.


My kids loved them and ate them all!! Best part is the cleanup is a breeze, which means more time to look for all the things I misplaced today!kid

Here are a few other versions you can try out….
Frozen Yogurt Carrot Bunny Bites
Chocolate Chip Peanut Butter Frozen Yogurt Bites


Butter Crunch Toffee DIY

Sweet, delicious butter crunch candy.

With the holiday season just around the  the corner, I thought I would share this easy edible gifts. This is one of those recipes, that tastes like it takes a lot of work, when in truth, it’s super easy and quick.

This is a great indulgence type of gift, perfect for the over indulgent nature of the season. Packed in a mason jar or a small candy box and decorated with a pretty festive ribbon. It’s a nice little gift for teachers, friends, neighbors or anyone really as it is super delicious!!

This is a recipe my Mother shared with me and there is two things you should know about it….

1- It’s delicious!

2-It’s REALLY easy to make

This is what you will need….

1lb of butter

3 Cups of Sugar

1/4 tsp Salt

1 Cup of nuts chopped up…I used Cashew Nuts, but Brazil nuts and almonds also work.

Chocolate or chocolate candy melts

Candy thermometer

Jelly Roll Pan..or a baking sheet with sides ( ised a baking sheet that measured 12×16)

Pizza cutter

WOODEN SPOON

Ready?????

In a medium sized saucepan, melt your butter and add in your sugar and salt, mix it all up.

Keep mixing, and mixing at a medium- high heat right before it hits 300 degrees add in your nuts. AS it reached 300 degrees it will turn  lovely golden color.  Take it off the heat and pour it into your jelly roll pan or baking sheet. You do not need to grease or butter the pan before hand as the butter in the recipe is significant enough to where it will not stick to the pan .

Give it a minute or two and let it set a bit.

Run your pizza cutter through it to make little squares. You will know that it has set enough if the score marks don’t disappear, if they do, give it another minute and try it again, repeat if necessary. Let cool completely. When it’s completely cool, it will be very easy to break into little squares. You may want to dust it with some cornstarch to absorb the excess butter 🙂

Try not to eat too many pieces.

Melt your chocolate and chop up some more nuts to sprinkle on top. You could also use colored sprinkles to match the occasion or whatever you choose.

Dip it into the melted chocolate and set it on a cooling rack, I put some wax paper underneath to catch the drips. Sprinkle with nuts or whatever you like before the chocolate sets.

You can dip them anyway you like, they are thick enough that you could coat one side without getting your fingers all chocolaty when you dip them.

After they have all set..package them up and give them as yummy holiday gifts gifts! This recipe makes quite a bit, so you can make a few packages up using, tins, cello bags or boxes!!!

Hope you enjoy!!!

The 1st Halloween Creepy Love Story.

Frankenstein & His Bride.. welp that was a love story of epic proportions….or not so much. Bits and parts of dead people combined into one, brought back to life, but feeling unfulfilled he seeks a mate, enter in his bride. Creepy enough? BUT when they are Cupcake Wrappers, well then that is a whole new type of Halloween love story.

“When I first started with making Halloween cupcake wrappers and actually designing my own style of printables; I did not fully realize how much I would enjoy the creative process that it entailed”


This  Halloween Party Pack  is one of the first printables that started the ball rolling, a it crude, but just enough that it sparked a desire to create more and more! No party pack this year, instead I went with a fun versions of Frankenstein and his lovely Bride!!

These are a perfect way to add a little festive fun to any Halloween inspired occasion! And certainly are more fun then plain old cupcakes!! They print out on a standard letter sized sheet of 8-1/2×11 sheet of paper and come with one Frankenstein and one Bride of Frankenstein cupcake wrapper.

All you need to do is print them, use craft scissors and cut them out attach the ends with a small piece of tape, glue or staple.
Add your baked cupcakes into the wrappers after, these are not meant to be baked in the oven. They are like decor for your cupcakes, and they get added after.

The tops of their heads pops out of the wrapper creating a dimensional wrapper of sorts!

Such a love story between these two cupcakes!!!

Hope you enjoy these! Wrappers can be printed out from {{HERE}}

Editable Awesome Oompa Loompa Favor Box..Part 2

Oompa Loompa Favor Box.

No, I am not repeating my designs. I have made a version of this Oompa Loompa favor box  item before….see HERE. But that version was not able to be changed by the user, I would have to make the changes.

Oompa Loompa favor box

It’s not that I have issue with adding in custom text or personalizing the items to a customers specifications. It more that things move faster these days. People, including myself really don’t wan’t to wait to get things done. Especially if there are ways to just get things done faster and in the comfort and convenience of their own home.

People are busy and there are not enough hours in the day.

I’m sure like me, you also have a never ending “to do” list, I just try to do my part to help myself and others be able to check items off of there lists faster.

I have been slowly trying to create more self editing instant downloads (huge emphasis on the slowly part) and updating some of the items in my shop so that the customer can get what they want, when they want, without waiting 24-48 hours for me to do it for them.

There are some things the user needs to know…

Before attempting to download, edit and print the items at home. I get that not everyone understands how to do this, so I tried my very best to give as much information and resources available, so that they can personalize the item the way that they choose. A detailed info graphic is included with each download that outlines the necessary steps.

The files are in a PDF format, this means that you would need a reader to be able to open, see, edit and print the favor box. If you don’t have a reader Adobe offers one for free, which you can download for absolutely free HERE.

There are some differences

from the original “as is” version of this favor box. Firstly, the font has changed to something that fits the area a bit better, allowing for more text to be added by the user if needed.
Oompa Loompa favor box

There are two lines available for text, which for the most part can fit typical phrases and other occasions that favors are used for.

The original version of this had the image of the Oompa Loompa’s face on the back and front. But with this editable version, the back of the Oompa Loompa is just the back of its head.

Oompa Loompa editable favor box

The size is still pretty much the same as the original , the only thing that really changed was the front font and that it can be instantly downloaded, edited by the user and printed at home.

Since I tend to get a lot of repeat questions. I will try to answer a few of them here…

What kind of paper should I print this on? Well although this seems pretty obvious to me, it may not be that obvious to others. The thicker the paper or heavier the weight, the more sturdy the boxes will be when they are done. But don’t print it on such thick paper that it becomes difficult to fold it neatly when assembling it. Also every printer has certain specifications on the paper it is able to print on, so be sure to check before you purchase the paper.

Can you resize this? At this point it is designed to be printed on Letter sized paper that measures 8-1/2 x 11. AT this point I haven’t fully worked out the details of other paper sizes such as A4 and such, but do hope to work out the kinks with sizing in the near future.

What if I can’t print at home? Then once you have made the necessary changes to the file, you can save it and upload to a local copy shop to be printed; like Staples, Office Max and Kinkos just to name a few.
Just be sure to bring the permission to reprint the image with you. This is included with the download. If you still have roadblocks, please contact me and I’ll be happy to help

I am excited to start this new part of my shop. And I feel that the options will continue to give more creative options for the customer, to help them bring their Willy Wonka Parties and all the other occasions to full fruition in a cost effective way.
I hope you find this new version, even better than the first! Feel free to let me know how it works out for you!


Golden Ticket Invitation! Create a #1 winning party!

“I’ve got a golden ticket…”


So….Who needs a Golden Ticket in their life???

Finally……..After too much time, I have finished the editable version of this fun Willy Wonka Golden Ticket Chocolate bar. Sadly, It has taken me a bit longer then I expected to get it exactly how I wanted it to look.
But if your life is anything like mine, welp then you completely understand time is short and there is just never nough of it to get all “the things done!” 

Since I’m a big daydreamer and can float away on a bubble of my own thoughts….I love to think about all the things I could get done, with just an extra five hours or so.

  • Clean the whole house…Check
  • Laundry, washed, dried & put away. Check
  • Dinner prepped and ready. Check

I’m sure I could find more interesting things to do with my imaginary extra time, but that’s the delicate line I balance my existence upon.  Doing my best each and every day to explore a path of possibility, that I hope one day will reward me with self sufficiency and financial independence.

But I’ll be honest, this whole building a business  AND wearing the traditional hat of a SAHM is a challenging and sometimes draining experience. But one in which I would rather embrace and work out all the details, rather then feel like my entire spirit being crushed under the weight of a 9-5 j.o.b. That I hate, but pays the bills.

Been there, done that. Not really interested in repeating that. But alas, here it is finished and Ready for you and the  awesome Willy Wonka occasion you are going t host!

I’m ok with it as a first version. But I think the end result speaks for itself. At the moment I have it available in the 4×6 size, I may include a 5×7 version in the future, but I can’t say exactly when that will happen as of yet. 

One of the great things about it, is that it is editable…See all those blue highlighted areas in the image???? That is where it gets fun, if your weird like me? It’s fine if you think that is fun too, let’s embrace our weirdness. Life is too short to force ourselves into a mold of normal, we were never meant to be shoved into.

Golden Ticket invitation

Back to those blue highlighted areas, now these are the areas YOU can personalize or customize with your own information. Name, occasion, date, time, address, rsvp information. Add whatever details you prefer at your own convenience. All that is required is that you have the latest adobe reader, which you can find and download for FREE here —> https://get.adobe.com/reader/  just instal on your computer and you will be able to edit.
Please note, that at this time you cannot edit on your phone, tablet, iPad or similar handheld devices, although I am sure that will be an option in the near future as things continually develop and move so fast.

This I made to be a digital download, meaning that after you purchase it, you can download at home, add in the details and then either print it at home or upload to a local printer and have as many as you like printed out.

Pretty sweet if you ask me.


I also included a yellow chevron pattern which can be printed on the back of the invitation, to give it a nice finished look.

So not only does Charlie have a golden ticket…..you can too!

You can find it HERE for purchase!

Here are some other great additions to a Willy Wonka themed event!


Enjoy!


Brighten Your Day with Free Unicorn Crown Printables

Free Unicorn Crown Printable with 2 Fun versions to print at home!

Unicorn Crown Printable

Rainy days, no matter what the season means being trapped in the house with the kids. I am not one of those Moms, that like to travel with all four kids in the rain, although I can handle it, in my experience my kids cannot. Someone always needs an umbrella, which they don’t, because lets face it.

It is easier to make a mad dash sporting a hood of sorts to whatever location may be drier, then taking out the umbrella; four in my case, because everyone needs they OWN. Then fighting with it in the wind, finding myself running after it when they let it go. Trying to explain how to close it, listening to them complain how wet they are. And I’m sure there are a million and one other scenarios, that I don’t need to illustrate, because you already have your own experiences to remind you.

So now instead of braving the weather, I have learned to embrace the idea that we don’t travel  in bad weather if possible; which I am 110% okay with, and instead have a trick or two up my sleeve to keep kids occupied, sane and not at each others throats for breathing the wrong way when stuck indoors.

Typically it means I have to help them help themselves. Dressing up still is as fun today as it was when they were really little. The characters change a bit in the journey, but all in all, in my experience it’s still good clean fun, that allows them to stretch their imagination muscles., this is where printables, and specifically a Unicorn Crown that can be printed at home

 My youngest daughter is probably in her last year or months where the idea of being a princess is still fun and her thing. But couple that with the new trends that surround her in school and life, new elements emerge.

Like unicorns…..with that, now a unicorn princess is totally a thing.

It has been some while since I have offered a printable out for personal use for free, but since I got it together for them I thought I would share it here for any other people that have unicorn, princess loving kids. Because my daughters wore them for days, and even made ones for their baby dolls.

)

The crowns print on a standard Letter Size (8-1/2×11) paper. I would suggest using  a thicker paper like card stock, so they will hold up longer and the thicker paper works great for that unicorn horn!

Print and cut out all the pieces. The two strips you will use to size up or down for your child’s head size.

Attach to each side with either glue, tape or staples to complete the crown. Alternately you could also cut small slits at the end of each side of the flower crown and use a colorful ribbon (thick) and then tie around the head to attach


And if you are by chance having a Unicorn themed party,  pair the crowns with these fun toppers


Unicorn Crowns can be downloaded from HERE..

Unicorn Crown Cupcake toppers can be  downloaded from HERE!


You will need Adobe Acrobat Reader software or a PDF reader in order to print the file. If you are unsure if you have this on your computer(most PC’s have it) you can download a free versions of Acrobat Reader from www.adobe.com.

Any questions??
Please feel free to reach out to me!

All designs and artwork are the intellectual property of Morgan Powers. These files are for personal use only and subject to copyright laws. File is for non-commercial use only, you may not forward, sell, share or distribute this file without the express written permission of Morgan Powers.

Have any questions? Contact the shop owner.

All designs and artwork are the intellectual property of Morgan Powers. These files are for
personal use only and subject to copyright laws. File is for non-commercial use only, you may
not forward, sell, share or distribute this file without the express written permission of
Morgan Powers.


Enjoy!

Morgan mighty Delighty

Winning Golden Ticket Decoration

Disclaimer: As an Amazon Associate I earn from qualifying purchases. What this means is that.Some of the links in this post are affiliate links. This means if you click on the link and purchase the item, I will receive an affiliate commission at no extra cost to you. All opinion remain my own.

I love Willy Wonka and all things inspired by the book Charlie and the Chocolate Factory, written by Ronald Dahl. It has influenced me in so many different ways through my life. I love creating new ideas based off of that classic story.


*Use the promo code below to receive 50% off of your order of three or more item listings via the Mighty Delighty Etsy shop  

MIGHTY50WEB

*Offer valid through May, 5 2023. Minimum purchase of three listings to qualify for the discount. Offer valid only for digital downloads. Not applicable to custom orders. No changes or personalizations of items. If you are interested in a custom order, please reach out to me HERE (etsy.com/message/new) to discuss design and pricing options.

Like an over sized WINNING Golden Ticket. 

Winning golden ticket

Let me preface that, as an adult, I personally would prefer a winning lottery ticket that pays ridiculous amounts of money. But as a kid, thinking about all the amazing and magical things that would be  experienced once inside those locked gates was something  my imagination could run with.

In the spirit of allowing the creativity of thought to run wild in all the wonderful ways that it can, led me to putting together this fun printable. Because let’s be honest;  if your having a Willy Wonka party, is there really any other way to to spark the imagination with possibilities more so than with the idea of a winning golden ticket? Who hasn’t wanted a winning Golden Ticket after learning about its value through this classic story! All that was required to be granted access into the world of possibilities was this!  It was the key to it all the wonderful, whimsy, magical chocolate factory  fun of Willy Wonka!

CHOcolate factory winning golden ticket

There will be an editable version sometime, soon. I’m still getting everything back up online and together. But for the moment it can be purchased as an instant download through my Etsy shop HERE, which is also where you can also find a variety of other Willy Wonka themed party items.

Once printed and cut out, it measures approx. 9-3/4 x 7-1/4.   It is formatted to print on standard US Letter sized paper which measures 8-1/2×11 inches. You can print it on regular old printing paper, but if you want it to be able to handled a bit, then I would recommend to print it on a sturdy thicker paper such as card stock. 

If you are printing from home, be sure to check your printers specifications for the limits of paper weight that it can handle, before you go and buy a ton of paper only to discover it gets jammed in the printer. I found that out the hard way several times, so I’m sharing that tidbit, so you can learn from my mistake and not make the same one!

Below you will find the brand that I prefer to use. I use a laser printer, so there are some papers that work better than others…this is one I love. Hammermill Premium Color Copy Paper. I like the how smooth images print. It is sturdy enough not to curl, but not thick like a heavy weighted card stock.

<center?>

Once purchased it is available for download from your registered Esty account, you can also check out as a guest if you you don’t wan to be bothered. Instructions on how to download from your Etsy account can be viewed HERE From there you can print It is available for instant download once payment is processed. It can be printed as many time as you like or uploaded to a printer service where you can order whichever amount you like.

Chocolate factory golden ticket

Please keep in mind that this is for personal use only, it is not meant to be used commercially. So please be a decent human being and don’t resell my images, mkay!

You can find more information about the Golden Ticket HERE.

Winning Golden Ticket Cupcake toppers can be viewed HERE

Chocolate Factory Golden Ticket Cupcake Toppers

Golden Ticket Chocolate Bar Editable Invitation Can be viewed HERE

Chocolate Factory Chocolate Bar Golden Ticket editable Invitation

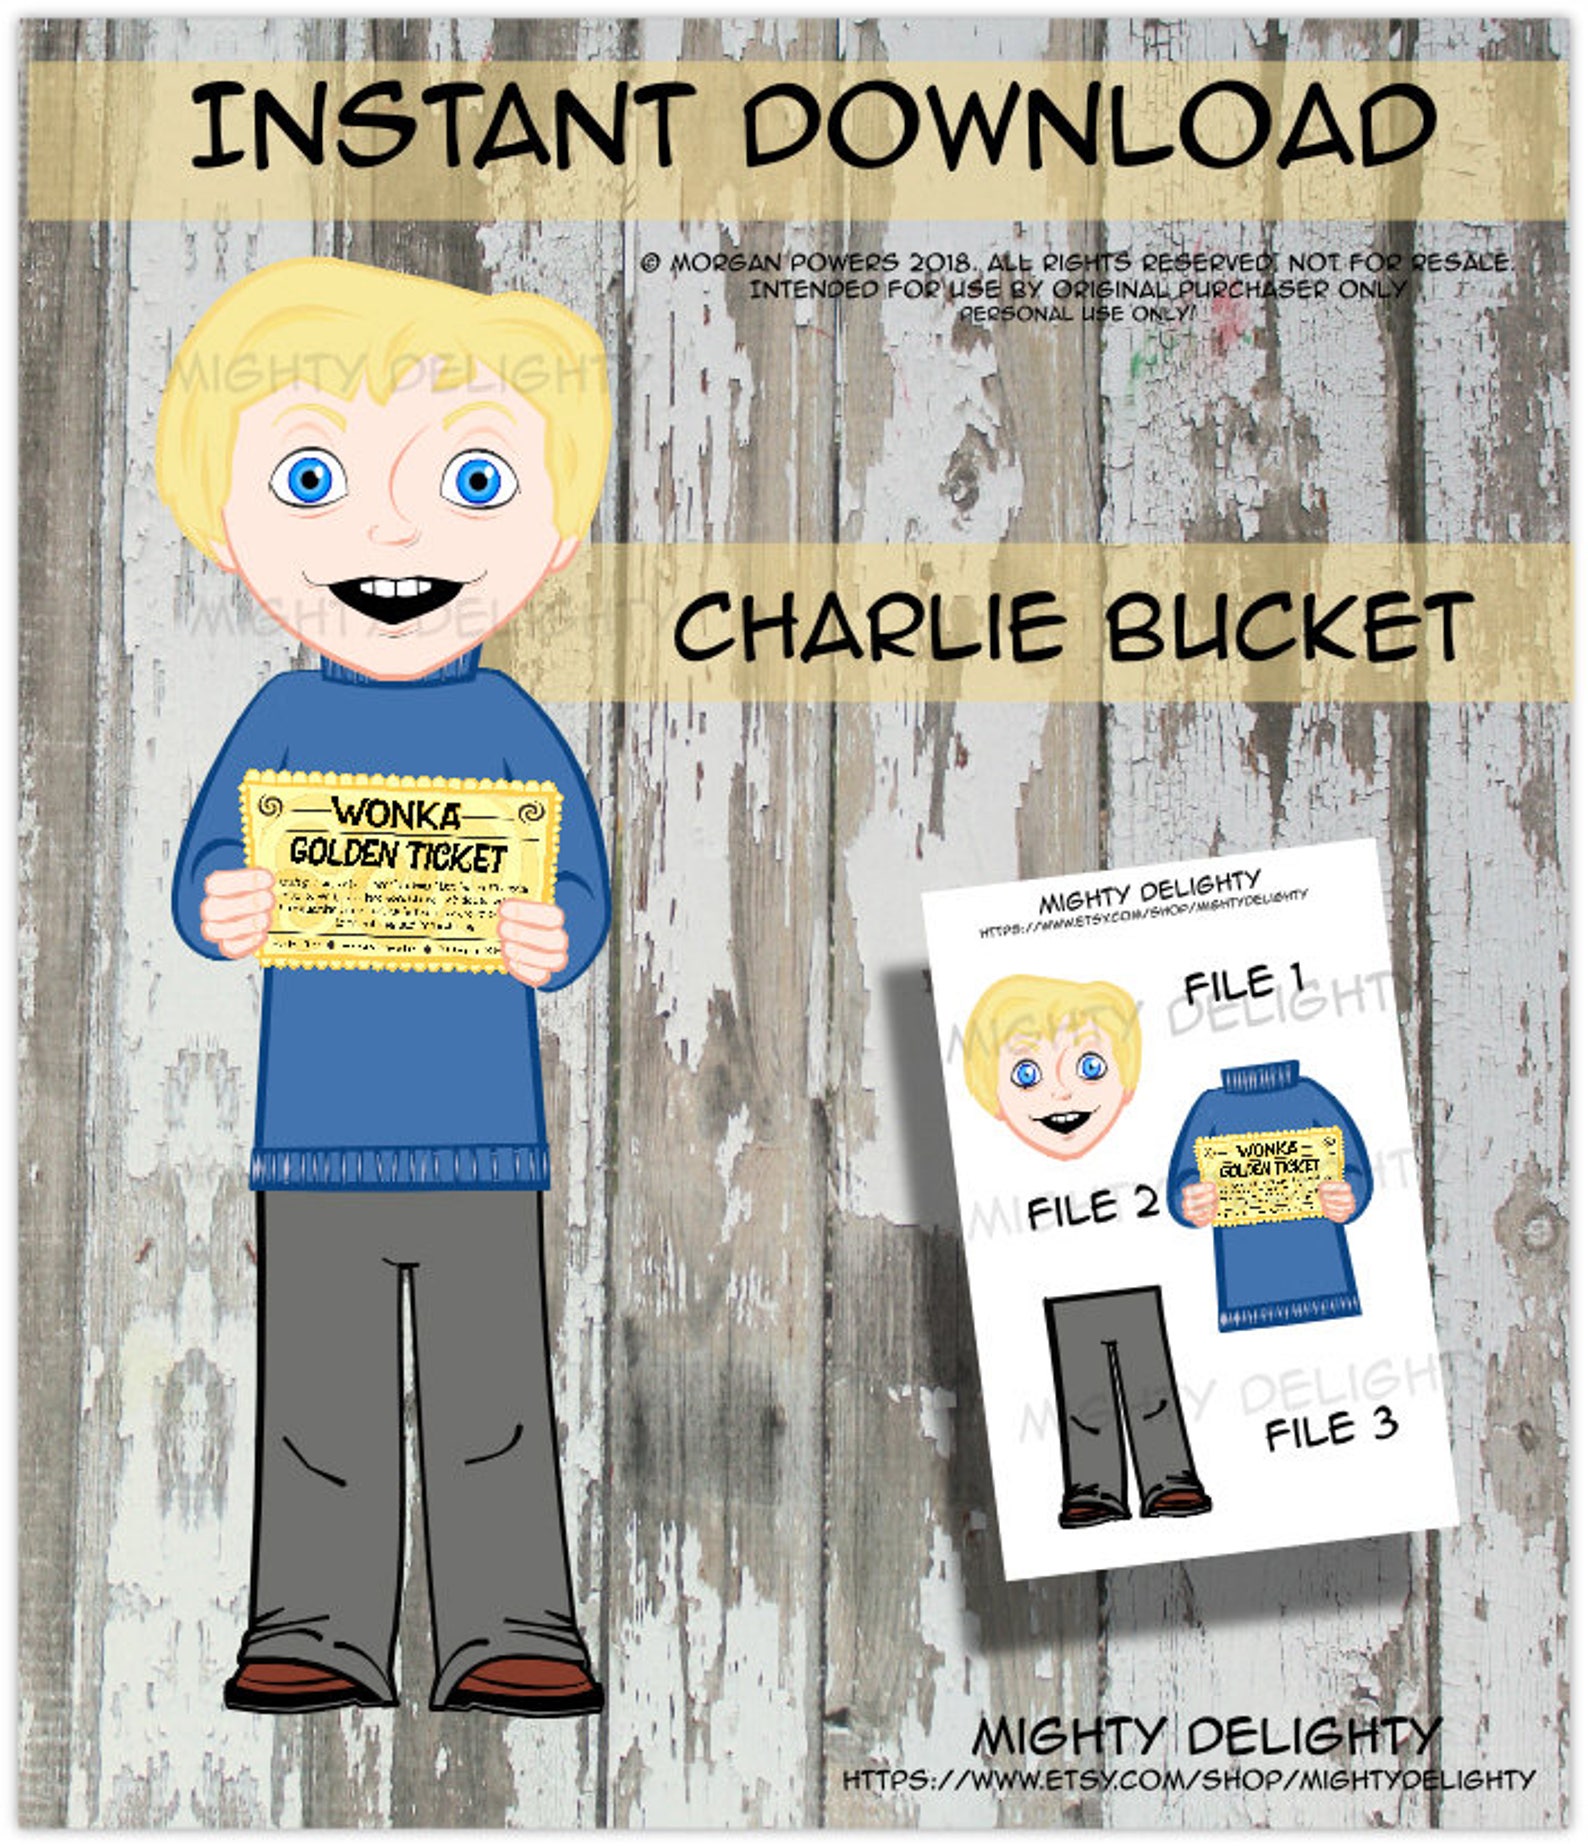
Charlie Bucket Decoration Cutout

Im not sure why it has taken me so long to add Charlie Bucket to the Willy Wonka Inspired gang, but now that he is done, I feel like he is a great addition to the rest of the items.


Charlie Bucket

He is available for instant download and can be purchased through my shop, which can be found HERE.

He is composed of three PDF files, which can be printed at home or uploaded to a printing service. You can print as many copies as you wish (For personal use only…obviously-otherwise that is just stealing!)

Cut him out and assemble using tape, glue or whatever adhesive you prefer. Just another way to add some fun to your Willy Wonka Inspired Party!

You can also purchase and download Golden Ticket toppers, if you like HERE.


Thanks for reading!

Oompa Loompa Favor Boxes

Oompa Loompa favor box
 

Oompa Loompa doopa de do…get that stuck in your head…

Slowly but surely, I have been adding more items to complement the  Willy Wonka Party items, based off of the stylized version of my Oompa Loompa toppers. There are so many ideas that are in my brain just waiting for the time and opportunity to manifest themselves. So this particular inspiration idea for a favor came about at the right time, where one of those very rare, unexpected blocks of time made themselves present in my life.

Currently I am still not up and running full time, because you know that whole SAHM thing gets to be a juggling act, when trying to works as well. I know there are so many people in the world that are built to make that work, but for the moment that is not who I am. My brain gets to overstimulated if I try and juggle too many tasks. So I m doing my best to make peace in the moment, to know that my job at the moment it to raise my kids. So until the time comes where I can more consistently focus on this all. I will be random and all over the place.

I thought that it may be appropriate to add in a bit of a how to assemble type of post, because I would rather just write it out once than to explain it over and over again. To begin, these are a digital PDF file available for purchase through my ETSY shop. You can purchase it in the Favor Box section of my shop and it goes along with the themed Willy Wonka items in my shop also available as digital files for download.

An instant download digital file, if you are unsure, is simply a file that you can purchase and print at home basically immediately after purchase. If you don’t have the means to print at home, no problem, you can just print through a local printer like OfficeMax/Depot, Staples, Kinkos, etc.  They always print out great and at a great price. All the info is available in each listing or I can easily be contacted through my shop if one had additional questions!

The first thing that needs to be done, obviously is that the file needs to be printed. These are formatted to print on a standard US Letter Sized paper, which measures 8-1/2×11 inches. At this point in time I do not have this available for any other sized paper, I may offer that option in the future, but do not have it presently.I would suggest using a heavier weight of paper, as regular printing paper will be a bit to flimsy.  

I order to free the little Oompa Loompa and get him ready to be filled with whatever favor goodies you will be putting inside, you will need the following…

  • Card Stock 110# recommended ( Think Index Paper)
  • Sharp scissors
  • A Ruler or something with a flat edge for folding
  • Ribbon
  • Hole punch
  • Hot glue, glue dots or tape
  • Fun stuff to fill box with

Print out the image (or however many you will need. I have found that, before you cut, flip the paper over and make fold lines. The first one may be a bit awkward, but after that it just goes smoothly. It is so much easier to do this before any cuts are made. the folds make assembling them later so much more streamlined. Once you have added the folds/crease lines, it’s time to free the Oompa Loompa from his little paper prison.

Make a rough cut first, then go in and cut out the smaller finer parts. Bend the box over gently to match up the tops of the favor box and use a hole punch to create a ribbon hole thorough the hair. Fold the box so that the sides can be attached. I use hot glue, but whatever method you prefer to use is up to you. I folded the middle portion on the inside and then folded the outer flaps in. Once it is all sealed this is the inner portion of the favor box.

Using the ribbon color and thickness of your choosing, pull the ribbon through the hole in the hair. Making bows has never been one of my most favorite things in the world to do,but it really “ties” it all together!

Total height is 4.34 inches, although the actual favor box height is 2.46 inches. These are not huge favor boxes, but the can hold some candies and goodies. And they definitely look super cute all lined up

The side view measurements are 2.45 inches in height 1.84 inches in width.

Such a fun way to end any Willy Wonka themed party with a unique and festive favor box. Any questions please feel free to contact me through the shop or  here.

I also created a version of this favor that is editable, which allows the user to add in their own details. Info about that particular favor can be found here


Badass Batman Party Invites

Disclaimer: As an Amazon Associate I earn from qualifying purchases. What this means is that.Some of the links in this post are affiliate links. This means if you click on the link and purchase the item, I will receive an affiliate commission at no extra cost to you. All opinion remain my own.

batman custom die cut invitations

Batman Party Invites

Well hey there!! My little guy turned four a few months back and we decided that we would go with a Batman birthday party theme, since you know he is four and well he likes Batman.

I always find a birthday is the best time for me to be able to design some fun themed invites for the kids.

I wanted to do something a bit differently, so these batman birthday party invites were custom design specifically for this batman party!

For this invite I used an image of Batman popping out of the top of the invite and the Bat logo slightly protruding on the bottom of the invite. Each invite measured approx. 4×6, image was laser printed on 100# card stock and then die cut with a white edge border which made them pop even more.

To make sure that the party theme flowed into the actual party, these little extra cards were  mailed along with the invites asking that all Bat boys and Bat girls come to the party dressed in their  favorite Bat gear.

To make sure that no one is ever left out cupcake toppers were made using the Bat logo in both Yellow and Pink. Because more often then not, everyone fights over the colors. Why?? I don’t know, I’m not four and stubborn 🙂

For the cake instead of making an edible topper, which I have done numerous times in the past. I decided to go with a non-edible type of topper. I created a 3D layered image of a Chibi Batman holding a Personalized Balloon which was set in front of a City Background scene with the Batman Logo in the night sky.

After seven years of birthdays for several children of my own as well as many customers, I realized that the time I put into creating an edible topper was almost silly, since it was almost always immediately tossed aside after cutting the cake. With a non-edible option I was able to give to my kiddo to have in his room afterwards. This made the time I put into designing and creating it less wasted on a moment of ooooh.

Overall the party was a huge hit, besides the fact that it rained non stop the whole day and the outside party, became an inside party bursting with people.

If you are interested in purchasing these invites please feel free to contact me through my ETSY Shop HERE to discuss options. I offer both digital print at home options as well as fully printed and die-cut invitations, personalized to your occasion!

If you are interested in discovering how I make such cool stuff, this is what I use. Its a die-cut machine called a Sillhoutte Cameo. My creative mind has opened a whole new level with the addition of this.

Hope you enjoyed! Thanks for stopping by!