Sometimes I just feel the need to “make” something and I don’t mean make by pulling out my recipes and picking one. What I mean is using an ingredient as a starting point of inspiration and creating something delicious.
I need to share with you that “sometimes” this need backfires into a mess of nothing, and then at other times like “this” time I hit the bulls eye…
Dead center!
Enter this sweet delicious dessert….creamy, sweet pumpkin filling accented by a sugary, cinnamon graham cracker crust, with a layer of chocolate butterscotch filling nestled in between.
I finished it off with a dollop of fresh whipped cream, a pinch of cinnamon and half of a graham cracker square. It tasted S.P.E.C.T.A.C.U.L.A.R !!
Perfect for the upcoming holiday season: a different treat for Halloween parties or even for Thanksgiving gatherings! I used little custard dishes to serve them, but you could use any type of small dessert bowls.
To make it, this is what you will need:
For the filling
1/2 Cup of Pumpkin filling
4 Ounces Cream Cheese
3-4 Tbsp. Sweetened Condensed milk
2 Cups Confectioners Sugar
1/2 Cup of Heavy Cream
1/2 tbsp Vanilla Extract
1/4 tsp. Cinnamon
For the chocolate butterscotch filling
1/4 Cup Butterscotch chips
1/2 Cup chocolate Chips
1/2 Heavy Cream
1/4 Vanilla extract
Pinch of cinnamon
For the Crust
1 Package of graham crackers
3 tbsp. melted butter
1 tbsp. sugar.
1/2 tsp cinnamon
In the blender mix the graham crackers, sugar and cinnamon. Pulse until it becomes a fine meal. Add this to your melted butter and combine well. Scoop out even amounts and press it into the bottom of your serving cups/bowls or whatever you will be serving them in 🙂 Put them in the refrigerator while you prepare the chocolate/butterscotch filling.
In a small cup add you vanilla extract and pinch of cinnamon, put to the side. In a microwave safe dish melt the chocolate chips and butterscotch chips until smooth, put this to the side (although you will need it sort of close to you.)
In a saucepan, add your cream and cook on a medium high heat until it begins to boil, once it reaches a boil remove it from the heat and add in the melted chocolate and butterscotch mix. Immediately, begin to whisk the mixture until it becomes smooth. Add in the vanilla and cinnamon until it all is mixed.
Take your serving bowls out of the refrigerator and spoon a layer of the filling on top of the graham cracker crust and put them back into the refrigerator to set a little. Now it’s time to prepare the sweet, pumpkin filling!
In a small bowl whip your heavy cream until peaks form, and put to the side (you could put it in the refrigerator.) In a medium sized bowl add the cream cheese, vanilla extract and cream together, add the pumpkin filling and continue to cream. Now slowly add in the confectioners sugar, until it is all incorporated.
Add the condensed milk, and get you whipped cream ready to add in to the mix. Fold it into the mixture a bit at a time, until it is all added. Your filling is complete! I used a decorating bag and piped the pumpkin filling into the custard cups, but you could also spoon it in if you choose. Refrigerate until ready to serve. Finish it off with a dollop of fresh whipped cream, a pinch of cinnamon or nutmeg and a graham cracker.
I hope you will enjoy this as much as my family and I did! If you have any questions or just want to say hello to let me know you were here, please feel free to leave a comment below!
I use quite a bit of frosting in many of my recipes as well as my tutorials, so I thought it appropriate to include a quick recipe for those of you that wish to make your own.
Easy and delicious, you can add to this recipe to make as many different flavors as you desire!! It’s typically a base for any of my flavored butter creams. And it’s almost impossible to mess up, it’s a basic butter cream, so it’s simple and effective!
This is what you will need to make basic vanilla butter cream:
1 lb.of confectioners sugar
2 sticks of butter (1 Cup) softened
1-2 tbsp. Milk
1/2 tbsp. Vanilla extract
In a bowl cream the butter and vanilla extract. Slowly add in the confectioners sugar until creamy, add in milk.
This should frost approximately 24 Cupcakes.
That’s it..so easy.
Add in other flavors if you like. Butter cream is seriously HARD to mess up.Since the base of this recipe is butter, I use this frosting more for taste than for decorating, although you could use it to decorate..just refrigerate the finished dessert so the butter will harden up.
For a decorating butter cream please refer to the recipe below, it’s not as tasty, but serves it’s purpose.
Butter Cream for decorating
This is what you will need:
1 cup of shortening
1 stick of margarine (1/2 cup)
1 lb. of confectioners sugar
1 tbsp. meringue powder.
1/2 tbsp. of vanilla extract
3-4 tbsp. milk or water
In a bowl cream together the margarine, shortening and vanilla. Add in the confectioners sugar and meringue powder and continue to mix until all ingredients are incorporated. Add in as much milk/water to the mix until the desired consistency is achieved. This recipe works better for decorating, because unlike a full butter recipe, it holds it’s shape at room temperature.
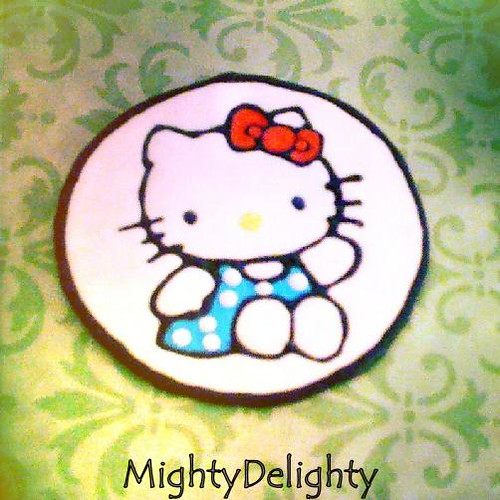
–> My two year old has recently fell in love with “Hello Kitty”. If she is to spot one randomly about, a sudden squeal of high pitched enthusiasm erupts from her pint sized self, as she points and repeatably squeaks…..”Kitty, kitty, kitty, kitty.”
Needless to say she likes Hello Kitty, and why wouldn’t she? Her character is so simplified and charming that it is so appealing to little girls, like mine. So I thought I would surprise her by making her some cupcakes with a picture of Hello Kitty on top!
They were a complete hit, she loved them!!!
For those of you that wish to make them as well, you can follow along with how I made them….
These sugar toppers were actually very easy to make and I made them in an afternoon; so even if you don’t have a lot of experience working with royal icing, you could still make these with no problems 🙂
To make any of the templates I use to create these traceable sugar toppers, I use a free program from Serif called Page Plus, it’s a great little graphics program to knock around with and it’s relatively easy to use. I found and downloaded a image of Hello Kitty through a Google image search, and using the Page Plus program I centered it in a circle a bit larger than 2 1/2 inches in diameter, (2.69 inches to be exact.)
If your not so graphic savvy you can print the templates from here Full Head Kitty and Blue Dress Kitty. I typically print out a few more than I need, this helps with practicing and for the inevitable mistakes that “I” always make.
Cover them in wax paper, and tape them to the wax paper so they will not move as you trace them.
Now you can make your royal icing. For these I used a Wilton recipe, which can be found {HERE} After you have finished making your icing, it’s time to start adding some color to it! In 4-5 separate bowls mix your colors!
Black will take A LOT of gel coloring, red a little less and the blue and yellow take very little. Start small and add if you need to. If you add to much coloring just add some of the un-tinted icing back into the mix to lighten it. If you have it handy you can tint the already white royal icing with the white tint….it does make a difference.
The consistencies of the icing should be as follows:
After you’ve tinted your icing, fill your decorating bags. You can cap off the ends with a coupler and some saran wrap until you are ready to use each color.
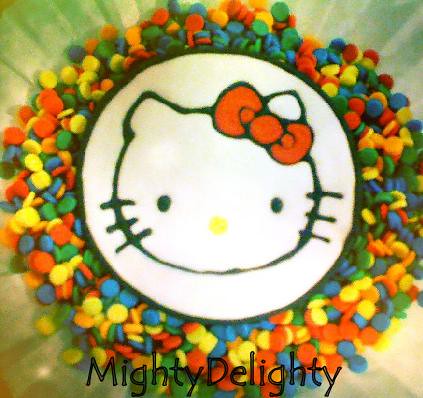
With your black icing and tip #1 start outlining Kitty’s face. Switching to tip # 1.5 and outline the small details inside her bow. (You can use #1 tip for all of this if you choose)
Still using the black Icing, switch to a #2 tip and trace the outer circle of each topper. Take your time!
When you are done, let them dry for 30-45 minutes…The longer the better! When they are dry you can begin filling in the bows. With a #1 or a 1.5 tip on your red icing , flood the inner parts of the bows.
When all the bows are finished, switch to the blue icing (if you are doing the Kitty in the blue dress) and with a #1 or #1.5 tip fill in her dress. As soon as you fill all the dresses, switch to the white icing with a #1.5 tip and add in the polka dots, they will meld into the blue a bit, but still remain raised .
With all the little details done, you can put them aside for about 15 minutes or so before you start flooding the remainder with white. When you are ready put a #1 tip on your white and begin flooding around kitty’s face and her hands and feet (paws) Do the inside of her face LAST!
When you are finished filling the face, switch to the yellow and a #1 tip and pipe the nose onto Kitty’s face. Just a small squeeze, to make a small dot.
Let the toppers dry completely for a few hours, before you peel them off.
This is what they will look like!
Now you are ready to put your cupcakes together! Yippee! Fill a bowl with some multicolored confetti sprinkles and set it to the side. Fill a decorating bag with vanilla frosting (or whatever flavor you choose.) I use a 1M tip for this, but you can use whatever large tip you prefer. Start frosting a ring around the outer edge of your cupcakes. It should look like this when you are finished.
Now dip the cupcake into the confetti sprinkles and gently roll it, coating the entire edge.
Finally, place the topper on top of the cupcake and gently press down, try to use equal pressure so as to not to break the topper, as they are very delicate! Voila...your finished Hello Kitty Cupcakes! Now pat yourself on the back, job well done!
These cupcakes can be stored in the fridge for a day or two without the royal icing toppers breaking down.You can also make these topper well in advance, just store them in an airtight container, until you are ready to use them.
I hope this was informative enough. Please feel free to comment below if you have any questions or to just let me know you were here!
Most of all though….enjoy and happy cupcaking!
Please note that this cupcake tutorial is meant only for personal and not commercial use!!
My better half, absolutely loves chocolate and peanut butter, so for his big five year anniversary in our fellowship, he requested Chocolate Peanut Butter Cake Pops for the big celebration.
I am assuming that whoever coined the phrase “..a match made in heaven” must have meant chocolate and peanut butter, because these are two flavors that seriously boost one another up. But then when you add cake pops to that equation, well you have that match made in heaven multiplied tenfold.
Which brings me to the topic of this particular post which is about how to make Chocolate Peanut Butter Cake Pops, or better yet, how to make awesome, delicious, O.M.G, I can’t stop eating these fantabulous Chocolate Peanut Butter Cake Pops…or maybe that is just me 🙂
I guess the only way to find out, is to make them yourself and be the judge.
Baking sheet lined with wax paper or parchment paper
Styrofoam or something to stand the pops in as they set (covered in Saran wrap)
Cake pops are seriously simple to make, but do require some time and patience, so make sure you have a chunk of time available to you in order to prepare them. I have two children ages 1 & 2, so whatever time I have MUST be used to the best of my ability.
For these cake pops although you can use any cake recipe you wish, to save time I opted for a good old box recipe, but the choice is yours. When I use a box recipe I also CUT the amount of oil that the box recipe asks for and replace the difference with apple sauce. (75% apple sauce to 25% oil) I’m sure you could do this with any recipe though. (It comes out to 1/4 cup of applesauce and 2 tbsp of oil.)
This is huge people.…..this one little change eliminates the need to refrigerate them, which in turn prevents them from cracking after you dip them and eliminates the oil from the mix oozing out from the pop.
When your cake has fully cooled, break it up into a bowl until it is finely crumbled. Add in the frosting and mix until it has all been incorporated, it will be very mushy looking. For one 13 x 9 or two 8″ rounds, I use 1/4 to 1/3 cup of frosting. You do want a nice balance of cake and frosting, and not just all of one or the other. If you use my recipe you may wan tot cut the recipe in half and save the remainder for something else as you will have some leftover.
When you are done mixing it all, let it sit, for a few minutes before you start rolling it out. I don’t really have a reason why, it’s just what I do:)
I measure out a heavy Tbsp. for each pop. I have found that measuring also helps to keep the balls roughly the same size. Roll each ball between your palms until you have all your little yummy pops to be, lined up.
After you rolled them all out, put them to the side and start and start to prepare your chocolate. You can melt your chocolate in one of two ways, using a double boiler or in the microwave, which ever method you prefer is the one you should use.
When your chocolate is ready, take a candy stick and a cake pop and one at a time and dip one end of the candy stick into the chocolate and push it gently into the cake pop, no more than half way. This helps to mesh the cake to the stick and helps when you dip them into the chocolate.
By the time you finish putting all the sticks in, the first one’s should be ready to dip. If not give them a few more minutes to set.
When you are ready to start dipping them, it is very important to have the chocolate be at the right consistency. (This goes for any type of chocolate dipping) If it is not thin enough, you will have big gloppy balls of chocolate and probably have them fall off the stick into the chocolate.
Holding the pop by the stick, dip it into the chocolate straight down. I tend to pull them up and swirl them to help free it of excess chocolate.
Yes, I am doing two at a time, I’m such a showoff 🙂
You can also tap the pop gently on the side of the bowl to remove the excess chocolate, rolling it if necessary.
After your done place them into the Styrofoam, so the chocolate can set on the pops. As they are setting, you can begin to get the peanut butter candy melts ready. I broke them up and placed them into a Wilton squeeze bottle I had, melting them in the microwave, with the cap off. When they are at the right consistency (melted) squeeze a squiggly or whatever design you choose over the top of each pop.
If you don’t have peanut butter candy melts available, just add in a tbsp of creamy peanut butter to the leftover chocolate and it should work just as well. If you don’t have a squeeze bottle, you could use a decorating bag with a tip, or a plastic food storage bag with a small piece of the corner cut off, to pipe the melted chocolate onto the pops.
After you add the first set of lines, you may want to go back over in the opposite direction, to really heap it on. I tend to store the pops in the fridge until I am ready to serve them. But you can leave them out as well.
Hope you try these out and if so, that you enjoy them as much as everyone at my hubby’s celebration did. I would love to hear your feedback, so please do feel free to comment below!
I love and I mean L.O.V.E peanut butter, to the point of where I will eat it straight from the jar.
I know, I know gross…unless you too also LOVE peanut butter 🙂
So it goes that I naturally adore a good Peanut Butter Frosting. Now this one is tried and true of which I use again and again and is always a hit. And it compliments a great piece of chocolate cake or can even be used as a filling for yummy chocolate cookies like {THESE}.
It’s quick and easy to make, but most importantly it’s GOOD.
This is what you will need:
3/4 Cup Creamy Style Peanut Butter
1 Stick of butter softened to room temperature
4oz. Cream Cheese softened
1/2 tsp. Vanilla Extract
2 1/2 Cups of Powdered Confectioners Sugar
1-2 tbsp. Milk )
In a mixing bowl add the peanut butter, butter, cream cheese and vanilla extract. With a mixer cream together on medium speed until all the ingredients are thoroughly mixed. Add in the confectioners sugar a little a time and mix well. Add in the milk and mix until all ingredients are incorporated fully.
For a fluffier frosting, beat the frosting at high speed for an additional minute or two. If you want a stiffer frosting add in more confectioners sugar and mix at medium speed, until the desired consistency is achieved.
Voila….and there you have it!
Use it on anything from cakes, cupcakes, even as the frosting to make delicious cake pops or you can do what I sometimes do and just spoon it from the bowl…which is not recommended if you are on a diet 🙂
Whatever way you choose, most importantly enjoy it!
I have been getting a few inquiries on the Monster High Cupcakes I had made a while back, so I thought I would share with you all how I made them. I’ve also recently made varied versions of the skullettes into cookies which you can read about {HERE} and I also made a skullette cake pop which you can read about {HERE}.
But if your not into the whole bake and create it yourself thing, you can print out these fabulous free Monster High Cupcake wrappers I designed from {HERE}and fun drink and goodie bag labels from {HERE}
Be forewarned this post is a bit lengthy, but covers all the basics to make them. But if you find that you need any help, please just ask 🙂
This is what you will need….
Cupcakes…duh
4-5 decorating bags
3-4 couplers
Skull template (I can help you with this)
Wax Paper
Royal Icing
Pink, red & black GEL food coloring
Pink sprinkles
Vanilla Frosting
Decorating tip # 1, 2 and 1M
Thin tipped food paintbrush (or toothpicks)
Time and Patience
Any supplies needed to make these cupcakes are available {HERE}
Before you start anything; baking, mixing etc. You will need a template to work from. You can create one yourself or just or you can print a copy from here ——> Skull & Bow Template.
If you want to be really brave you can try and make these in a miniature version by printing a copy of this miniature version from here ————>Miniature Skull & Bow Template
But if your not that savvy please shoot me an email at mightydelighty(at)gmail(dot)com and I will gladly help you.
I found and downloaded a image of the skullette using Google image search. With a free graphics program I use from Serif (Page Plus) I centered it in a circle a bit larger than 2 1/2 inches in diameter, (2.69 inches to be exact.) then copy and pasted the image onto the page 5 times , printing out the final version.
Cover the front of the template with wax paper and tape it to the printout so it won’t move when you begin tracing them with the Royal Icing. I tend make as many as I may need to trace out, plus extra in case I mess up on a few.
When that is done, make your Royal Icing. If you are not familiar with a Royal icing recipe and need a good one, you can find the recipe I use here, it’s from the amazing and awesome blog, The Sweet Adventures of Sugar Belle. It’s almost impossible not to get lost on her site for hours just browsing through all her magical and colorful cookies! (If your not making a lot of toppers just cut her recipe in half.) For 24 toppers I use about 3/4 cup of white, less than 3/4 cup of black and less than a 1/4 cup of pink.
When you begin tinting the black, keep in mind that it is going to take a lot of gel color to get it black. Pink takes a bit as well, but will darken if you add in a little red as well. The white can be enhanced to be even more white by using a white icing tint, but it is not necessary. Royal icing dries out as it is exposed to air, so cover each mixed color with a wet paper towel to prevent this.
Just a side note: Royal Icing darkens as it sits, so if you get it close to the color you wish…leave it alone for a bit and it will darken up!
After you’ve tinted your icing, fill your decorating bags. You can cap off the ends with a coupler and some saran wrap until you are ready to use each color. (Even though that is NOT what I did in this picture.)
The consistency of the black icing should be soft but not runny. I like it a bit softer, everyone has their own preference. White and pink should be of flooding consistency. If you need help with consistencies of the Royal Icing, please again check out This Postfrom The Sweet Adventures of Sugar Belle, she has so many great tutorials that can help you with this. Once you’ve got the consistency down, get ready to start making the toppers.
With your black icing and tip #2 start outlining the shape of the skull and the outer part of the bow.
Next fill in the eyes and nose. Do not worry about the eyelashes for now!
With the black icing, switch to a #1 tip and fill in the inner bow details.
Switch back to a #2 tip and start outlining the circle around each skull.
When your done, they should look like this…so cute 🙂
Now walk away for about an hour, to let them set and dry. (The longer they sit, the better they are.) If the black hasn’t fully dried, it may leach color back into the white flood color. This is usually a good time to clean up the mess made from making the royal icing and/or to start baking your cupcakes if you haven’t already.
If your going to take the time to make these awesome little cupcake toppers, please pick out an equally awesome cupcake wrapper…it will make a difference. I love the Reynolds Stay Brite Baking cups, because they look exactly the way they do before baking!
Now that your cupcakes are made, and cooling, let’s get back to the toppers! With a #1 tip on your pink icing, fill in the bows.
When they are all finished, put a #1 tip on your white icing to flood and the inner part of the skull.
Be careful when you work or you will do what I did…oooops!
After all the skulls have been flooded with the white icing, begin flooding the outer part of the topper with the white icing, still using tip#1. (A larger tip can be used, I prefer the smaller one)
I usually like to let them set overnight to really make sure they are dry, but a few hours will suffice if that is all you have. When making them, I usually make a couple of dummy ones, that you can use to test how dry they are. When they are fully dry you can peel them from the wax paper.
Now this is when the eyelashes are applied. In a little bowl add a small blob of the black icing. With your food paintbrush, gently add on the eyelashes. You may wan to practice on a piece of paper before you begin, to get the feel of it. If you don’t have a paintbrush, you can use a toothpick.
Now lets, start putting all the pieces together. Fill a bowl with some pink sprinkles and set it to the side. Fill a decorating bag with vanilla frosting or whatever flavor you choose. I use a 1M tip for this, but you can use whatever tip you prefer. Start frosting a ring around the outer edge of your cupcakes.
It will resemble this when you are done.
I sometimes add in a bit of chocolate frosting to the middle for an extra treat, but it is not necessary to fill the middle. Now dip the cupcake into the pink sprinkles and gently turn it, coating the entire edge.
Finally, place the topper on top of the cupcake and gently press down, try to use equal pressure so as to not to break the topper, as they are very delicate!
Voila...your finished Monster High Cupcakes! Now pat yourself on the back, job well done!
These cupcakes can be stored in the fridge for a day or two without the royal icing toppers breaking down.
If you need ANY help, please feel free to comment below or email me, I am always hapy to answer any questions you may have!!! Most problems people have encountered have been answered through the comment section, so be sure to check there as well!
Most of all though….enjoy!
****Many of the supplies, plus more can be purchased {HERE….at my shop to help spice up any Monster High Theme Party!
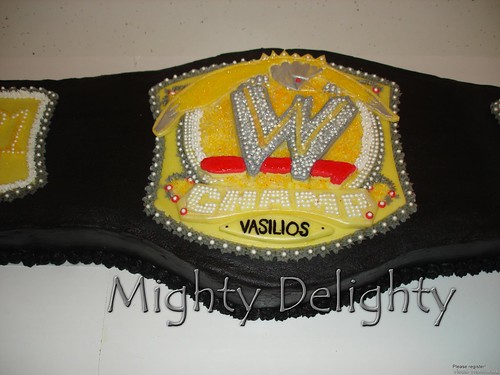
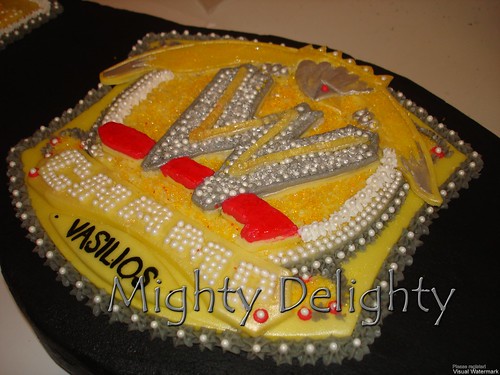
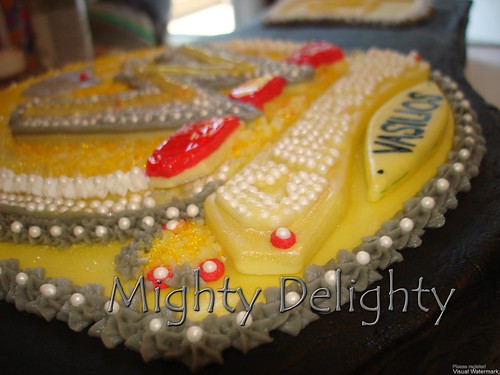
This past weekend not only did we celebrate Labor Day, but for my family we also celebrated Tim’s cousin turning 21 with a surprise birthday party. I was asked to make him a cake, but not just any cake, a WWE John Cena Championship wrestling belt cake. Now, I am always up for a creative challenge, but I think I better do some research before agreeing to certain designs in the future.
The image I had in my head, certainly was not as intricate as the actual belt itself, so I had to pull on my big girl creative pants to pull this one off….I still don’t really know how I did it.
I made a chocolate cake and covered it in tinted black chocolate butter cream.
For the middle belt part, I used a mix of fondant painted gold and silver, butter cream tinted yellow, red, gray and pure white. I also used yellow sanding sugar, and gold/silver tinted piping gel to add in a bit of shimmer and definition to the whole of it all. I also used those little round decorating balls as accents as well. Think gaudy diamonds…lol!
I sometime wish I had more time to dedicate to a cake like this, because now that it’s done, I would do it so differently the next time. The one thing a cake like this teaches you, is how to do it better and more efficiently the next time. It definitely was a hit and the birthday boy loved it…”Happy Happy Billy!”
I came across a recipe a few weeks ago for creamy peanut butter pie. I rarely make pies, they just aren’t my thing, but this one jumped off the page at me because it was more than a recipe. You see, it was a pie for Mikey, who happened to be husband to blogger Jennie of In Jennie’s Kitchen; and of whom passed away suddenly of a heart attack a few weeks back.
First off, I do not know Jennie, I never interacted with her online, and have only browsed through her blog one or two times, she is literally a stranger to me. But regardless of this, I felt her pain. I felt her loss. I felt the loneliness that had enveloped her once vibrant life at the sudden loss of her husband. I think I felt it so much more intensely, because I realized how easily it could have been me in the very same position as her.
For those of you who know me on a personal level, you most likely know that Tim (My husband to be) went to the hospital for chest pains last Friday. And if you know that much, then you most also likely know how they found a 99% blockage in his left coronary artery.(Also nickname the “Widow Maker”) The doctors told him he was lucky he had come into the hospital and gotten checked out when he did, because he was on the very brink of a massive heart attack, one in which he wouldn’t of survived.
Back to Jennie, she asked that those who wanted to help celebrate the love and life of Mikey to simply make this pie. So I did, but of course I made it my way (Sorry Jennie!) I used the same recipe, which can be found here.
The only thing I did different was make them into little pies or cupcakes if you prefer.
By far this had to be the best tasting peanut butter pie, cake, cupcake type of treat I have ever eaten. The peanut butter filling was a perfect mixture of velvety and sweet complimented by the crunchy, buttery flavor of the chocolate crust.
I hope you try this recipe and love it! I know Tim and I did and we also hold each other a little more as each day goes by…knowing how blessed and fortunate we are to have yet another day!
As Hurricane Irene is blowing herself up the eastern seaboard of the good ole’ USA., I’ve been baking in nervous anticipation of her blustery arrival.
It’s the way I gain control of a situation that essential I have no control over.. I’m located in Eastern Long Island, New York which puts me and many others right dab in the track of the storm. Many of the communities that line our shores are being told to evacuate.
Which brings me to my cupcake baking marathon. Family members that had to evacuate have set up camp at my sister in laws; a family of six and two cats, all holed up till Monday morning.
Me and my better half though it would make the storm go smoother if they had some sweets to munch on….Enter my Hurricane Irene Cupcake care package…
I made an assortment of Chocolate and Vanilla cupcakes; with different butter cream fillings and frosting. I also included my newest addition of flavored frosting, cake batter butter cream frosting. Yes, Cake batter butter cream frosting, and at that real butter cream frosting….mmmmmm about sums it up.
The next care packages I made for my brother and law and my nieces and nephews, although my B.I.L will have to wait till the end of the storm to eat his. He’s busy at work at Con Ed in NYC…helping to keep the lights on….or will be busy getting them back on….Thanks Jim! He had special requested these after I made them last weekend so, I made a batch just for him. Chocolate chip cookie dough filling/frosted cupcakes!
For my niece and nephew I gave them the standard fare of chocolate/vanilla cupcakes with vanilla frosting!!
I may lose electricity during and after the storm, so see you when this all is over!! I hope Irene ends up blowing away, but in the event she is as troublesome as they are predicting, please stay safe!!
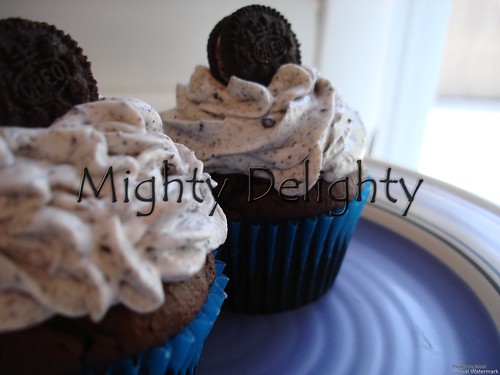
I’ve been on a flavor kick lately. Not so much with cupcakes, but with frosting. This is strange since I typically stick to standard vanilla/chocolate, but needless to say I’m going with it for now. Strangely enough, the flavors aren’t anything spectacular, but closer to comfort flavor from when my palette was less mature and craved things simple and sweet.
My last post was about egg less chocolate chip cookie dough filling and frosting and for this post well….I felt the intense desire to create a Oreo flavored butter cream! Which is simply my concoction of a vanilla butter cream that has crushed Oreo’s folded into it. The end result being the following….
Paired with a deliciously moist double chocolate cupcake and topped with a miniature Oreo, it was simply yummiliscious!!!
We use cookies to ensure that we give you the best experience on our website. If you continue to use this site we will assume that you are happy with it.OkNoPrivacy policy
You can revoke your consent any time using the Revoke consent button.Revoke consent


